| |
Wednesday, December 7, 2005
This entry is part 1 of a 7 part series. To jump to a particular entry, you can click any of the following links:
Hang on to your hats, kiddies... this entry is going to be a long one.
If you're following these entries in order, then you've done the brain work (planning out your logshipping) and the foot work of setting up your servers. That was the hard part... now comes the tedious part (at least it was for me as we're shipping 21 databases to 2 seperate locations each)... creating the maintenance plan.
A single maintenance plan in SQL Server will handle all of the log shipping for a single database regardless of how many destination servers you are shipping to. In our case we are shipping databases to a local server (that we will flip to in case of some type of hardware failure on the primary server) and to a remote server (that we will flip to in case our building gets blown away).
When reading through the following steps, the Questions I'm referring to are in the blog entry 'SQL Server - Logshipping Part 2 of 7'.
Create a Maintenance Plan:
- Open SQL Server Enterprise Manager
- In the Console Tree, expand the server that the SOURCE database resides on
- Under the Source Server, expand the 'Management' folder
- Right click on the 'Database Maintenance Plans' item under the Management folder
- Choose 'New Maintenance Plan...' from the context menu
- When the 'Database Maintenance Plan Wizard' pops up, click 'Next>' to get past the welcome screen (figure 1)

Figure 1 - DB Maintenance Plan Wizard - Welcome
- On the 'Select Databases' screen (figure 2), choose your database from the list of databases
*Note - If you choose more than one database, the logshipping checkbox will be disabled.
- Check the 'Ship the transaction logs...' checkbox
- Click the 'Next>' button to advance to the next screen

Figure 2 - DB Maintenance Plan Wizard - Select Databases
- On the 'Update Data Optimization Information' screen (figure 3) uncheck everything (This process will most likely be running frequently depending on your plan, so we don't want any long-running processes happening at this time).
- Click the 'Next> button to advance to the next screen

Figure 3 - DB Maintenance Plan Wizard - Update Data Optimization
- On the 'Database Integrity Check' screen (figure 4), uncheck the 'Check Database Integrity' checkbox (This can eat up time on large databases, so we don't want it in this plan).
- Click the 'Next>' button to advance to the next screen
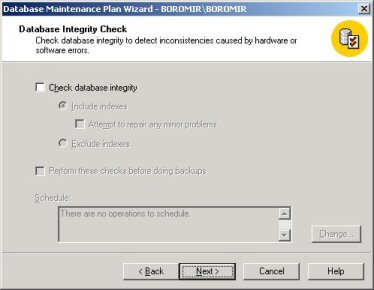
Figure 4 - DB Maintenance Plan Wizard - Database Integrity Check
- On the 'Specify the Database Backup Plan' screen (figure 5) uncheck the 'Backup the database as part of the maintenance plan' checkbox (Again, this would take too long on large databases, so it does not belong in this plan).
- Click the 'Next>' button to advance to the next screen
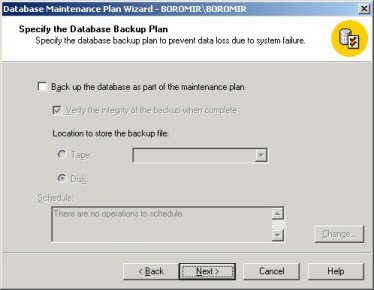
Figure 5 - DB Maintenance Plan Wizard - Specify the Database Backup Plan
- On the 'Specify Transaction Log Backup Disk Directory' screen (figure 6), choose the 'Use this directory' radio button to specify a specific location for log files to be created.
- In the textbox to the right of the 'Use this Directory' radio button, put in the name of the directory you specified in Question 6.
- Check the 'Remove files older than' checkbox (without this your transaction files would just keep accumulating until your drive is full).
- To the right of the 'Remove files older than' checkbox, set the time limits you specified in Question 7
- Click the 'Next>' button to advance to the next screen
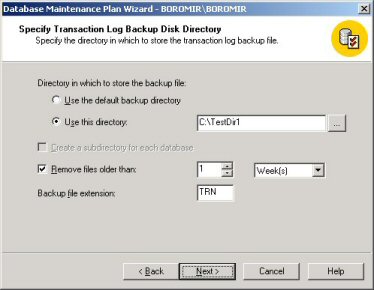
Figure 6 - DB Maintenance Plan Wizard - Specify Transaction Log Backup Disk Directory
- On the 'Specify the Transaction Log Share' screen (figure 7) click the ellipse button (...) and navigate to the network share that you created (last step of blog entry Part 3)
- Click the 'Next>' button to advance to the next screen
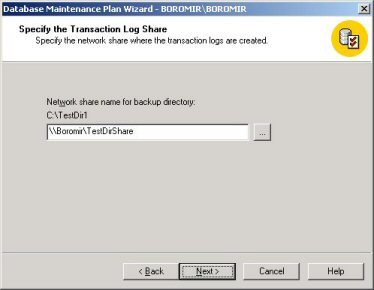
Figure 7 - DB Maintenance Plan Wizard - Specify the Transaction Log Share
- On the 'Specify the Log Shipping Destinations' screen (figure 8) click the 'Add...' button
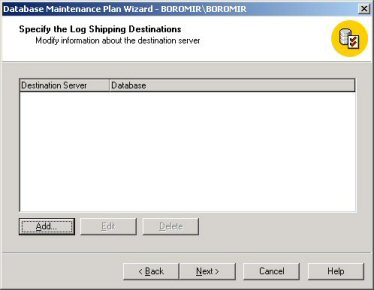
Figure 8 - DB Maintenance Plan Wizard - Specify the Log Shipping Destinations
- When the 'Add Destination Database' window (figure 9) pops up, choose a destination server from the 'Server Name' dropdown list
*Note - If your server does not appear in this list it is because it is not registered in Enterprise Manager. You'll need to cancel out of this screen and the wizard to register the server.
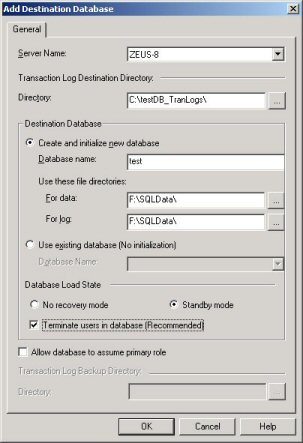
Figure 9 - Add Destination Database popup
- In the textbox for the 'Directory' field enter the directory you specified in Question 9
- Select the 'Create and initialize new database' radio button in the 'Destination Database' section
- I left the 'Database Name' and 'File Directories' fields as their default values. If you want to change the name of the database or where it's data files or log file is stored the you can change the values
- We leave our shipped databases in Standby Mode. In standby mode we can run queries against the database (but not update data). If you wish to be able to query your database, select the 'Standby Mode' radio button. If not, you can choose the 'No Recovery mode' radio button.
- We also use the 'Terminate users in database' option. The will drop the connection of any users in the database while transaction logs are being restored. If you want this to happen, you can check the 'Terminate Users in Database' checkbox. Leaving users in your database may delay the restore.
- Lastly, on this screen, is the 'Allow database to assume primary role'. This feature basically allows a role-reversal of the servers. We don't use this because the only time the backup databases will go live is if our primary server is down. So for us this is unnecessary.
- Click the 'OK' button and the 'Destination Database' popup will disappear.
*Note - Back on the 'Database Maintenance Plan Wizard' your destination server and database should now appear in the list (figure 10).
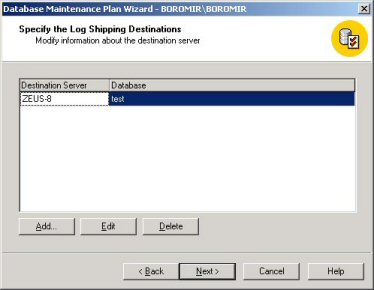
Figure 10 - DB Maintenance Plan Wizard - Specify the Log Shipping Destinations (after add)
- If you have more than one destination database, you can Click 'Add...' again and repeat the above steps
- On the 'Database Maintenance Plan Wizard' screen click the 'Next>' button to advance to the next screen
- On the 'Initialize the Destination Database' screen (figure 11), select the 'Perform a full database back now' radio button. You can use a recent backup if you like, but creating a new one just makes me feel a little safer.
- Click the 'Next>' button to advance to the next screen.
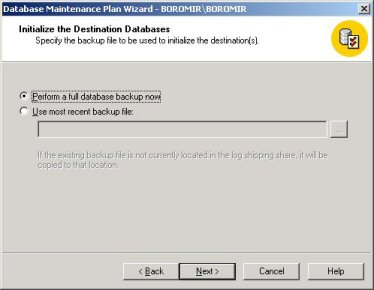
Figure 11 - DB Maintenance Plan Wizard - Initialize the Destination Database
- On the 'Log Shipping Schedules' screen (figure 12), click the 'change...' button
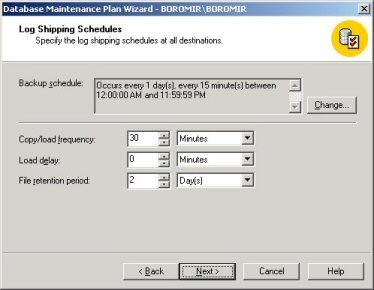
Figure 12 - DB Maintenance Plan Wizard - Log Shipping Schedules
- When the 'Edit Recurring Job Schedule' popup (figure 13) appears, edit the values in the 'Daily Frequency' section to match the values you specified in Question 4 and Question 8.
- Click the 'OK' button and the 'Edit Recurring Job Schedule' popup will disappear
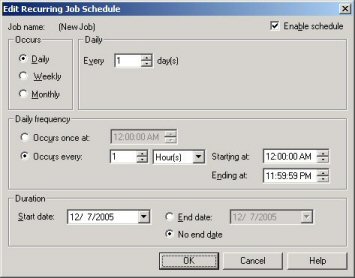
Figure 13 - DB Maintenance Plan Wizard - Edit Recurring Job Schedule popup
- Back on the 'Log Shipping Schedules' screen (figure 12), set the Copy/Load frequency to the value you specified in Question 10
- Set the 'Load Delay' to the value you specified in Question 14
- Set the 'File Retention Period' to the value you specified in Question 16
- Click the 'Next>' button to advance to the next screen
- On the 'Log Shipping Thresholds' screen (figure 14), set the 'Backup Alert Threshold' to the value you specified in Question 13.
- Set the 'Out of Sync Threshold' to the value you specified in Question 12.
- Click the 'Next>' button to advance to the next screen
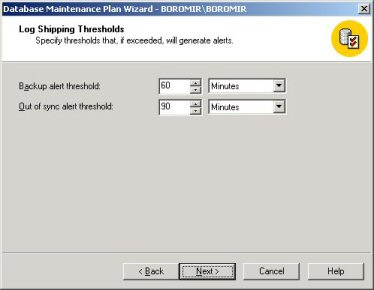
Figure 14 - DB Maintenance Plan Wizard - Log Shipping Thresholds
- On the 'Specify the Log Shipping Monitor Server Information' screen (figure 15) choose the server you specified in Question 3 in the dropdown list box.
- For the Log Shipping Monitor, you can use either Windows Authentication mode or SQL Server Authentication Mode. I was having a problem using Windows Authentication here, so I changed to SQL Server Authentication and was working fine. If you have problems with your LS_Shipping_Monitor_Probe account, see my blog entry 'SQL Server - Logshipping part 5 of 7'. It discusses some problems I came across and how I addressed them. Recreating the probe account was one of them.
- Enter the password for your probe account (when SQL creates this account it is blank as a default)
- Click the 'Next>' button to advance to the next screen
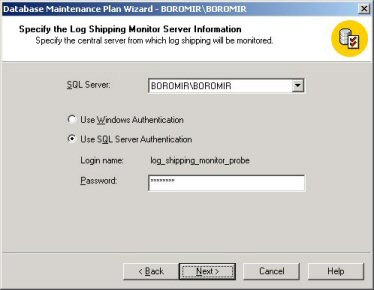
Figure 15 - DB Maintenance Plan Wizard - Log Shipping Schedules
- In the 'Reports to Generate' screen (figure 16) you can choose to have a reports generated by the maintenance plan. If you choose this, you'll need to specify the directory where they should be stored. You can also have the report emailed to an operator if you like. We don't use these options. In Blog entry 7 of this series I'll discuss how to check the system tables for errors and send out a report on a scheduled basis.
- Click the 'Next>' button to advance to the next screen
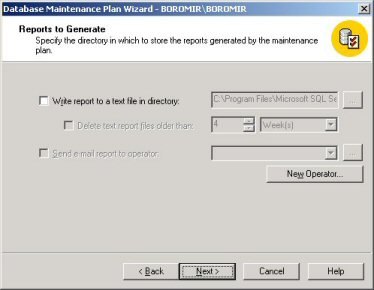
Figure 16 - DB Maintenance Plan Wizard - Reports to Generate
- On the 'Maintenance Plan History' screen (figure 17) Check the 'Write history to the msdb.dbo.sysdbmaintplan_history table on this server' checkbox. You can use this in the future to research and problems you have with logshipping.
- Click the 'Next>' button to advance to the next screen.
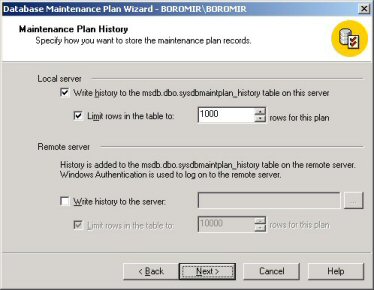
Figure 17 - DB Maintenance Plan Wizard - Maintenance Plan History
- On the 'Summary' screen (figure 18) you will need to name your maintenance plan.
*Note - Use something descriptive. I use LS_{databasename} so they all stay together and are easily found.
- Verify all of your information in the list box.
- Click the 'Next>' button to advance to the next screen
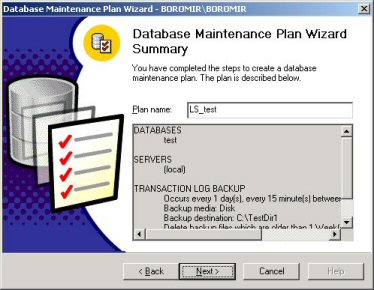
Figure 18 - DB Maintenance Plan Wizard - Summary
- On the 'Completing the Database Maintenance Plan Wizard' screen (figure 19) click the 'Finish' button. Each task in the list should have it's status changed to 'Performing this task' for a moment and then change to a blue checkbox with 'Succeeded' after it. Depending on the number of servers you are shipping to, your network, speed of your server, etc... this may take a while... up to 5-10 minutes in some cases... be patient!
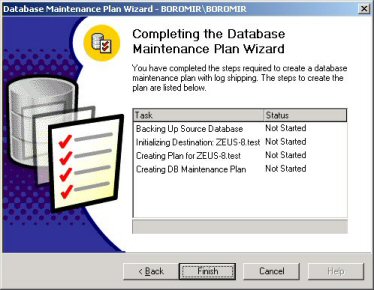
Figure 19 - DB Maintenance Plan Wizard - Completing
I ran across a few issues when creating my databases. The most frustrating was that if the wizard fails in the middle of creating a plan, it doesn't clean up after itself very well. I have documented all of my errors and work-arounds or fixes. They are in entry 5 of this series.
Well... that's all there is to setting up log shipping. Not too hard, just tedious. My first time setting it up was pretty un-cool... The two toughest things are getting your security to work right and dealing with Logshipping's bugs. Now that it's up though, it's been running flawlessly for months.
Chris Antoniak
DBA / Developer
|
|
Archive
Recent Entries
Blogs we read
|